Dealing with a leaking flat roof can quickly turn from a minor inconvenience to a major headache. Unlike sloped roofs, flat roofs present unique challenges that require specific techniques and materials. Knowing how to repair a flat roof properly can save you time, money, and prevent further damage.
After 20 years of repairing flat roofs across the Bronx, we’ve learned that fixing them the wrong way often causes even more expensive problems. Water doesn’t simply flow off flat roofs, making proper repair techniques essential to protect your home’s structural integrity.
This guide to roofing shows you a simple 7-step process for flat roof repair that helps stop further damage and makes your roof last longer. We’ll guide you on choosing the right materials and using expert techniques—so you’re fully prepared before you get on the ladder.
Understanding Your Flat Roof Material and Damage
Before attempting any repair, you must identify what type of flat roof you have. Different materials require specific repair approaches to ensure lasting results.
Common Flat Roof Materials in Bronx Homes
The Bronx’s variable weather conditions make certain roofing materials more common than others in our area:
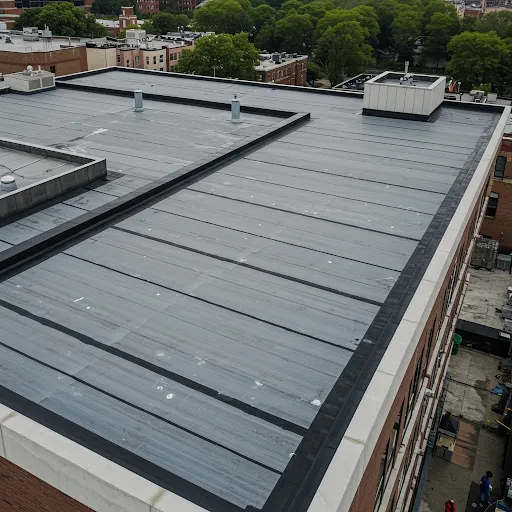
- Single-ply membranes (TPO, PVC, EPDM) – Synthetic rubber or plastic sheets that create a watertight barrier
- Modified bitumen – Asphalt-based material reinforced with fibers for added durability
- Built-up roofing (BUR) – Multiple layers of asphalt and reinforcing fabrics topped with gravel
To identify your roof type, look at its surface texture and color. EPDM appears rubber-like and is typically black. TPO and PVC membranes are usually white or light gray with visible seams. Modified bitumen has a granular surface similar to asphalt shingles, while BUR systems often have a gravel-covered surface.
Assessing Damage and Locating Leaks
Understanding how to fix a leaking flat roof begins with finding where the water is coming from—a tricky job since leaks often show up far from the actual entry point.
To locate leaks accurately:
- Measure the distance from interior water stains to the nearest two walls
- Transfer these measurements to your roof to identify the approximate area
- Look for obvious damage like punctures, tears, blisters, or separated seams
- Examine areas around roof penetrations like vents, HVAC units, and skylights
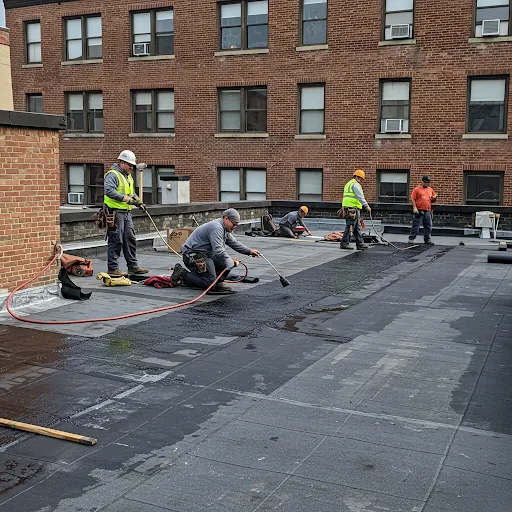
Always prioritize safety when inspecting your roof. Flat roofs in the Bronx often accumulate moisture, making surfaces slippery even days after rainfall. Use a sturdy ladder, wear non-slip footwear, and consider using a safety harness.
7-Step Flat Roof Repair Process
Following a systematic approach ensures you address the root cause of leaks while preventing additional damage. Our proven method works for most flat roof systems found throughout the Bronx.
Step 1-3 – Preparation and Damage Assessment
Step 1 – Gather necessary tools and materials
Whether performing a temporary flat roof repair or a permanent fix, collect everything you’ll need:
- Appropriate patching material for your roof type
- Roofing cement or adhesive
- Fiberglass mesh for reinforcement
- Utility knife and scissors
- Broom and cleaning supplies
- Measuring tape
- Chalk for marking
- Safety equipment (gloves, goggles, non-slip shoes)
Step 2 – Clear and clean the roof surface
For successful DIY flat roof leak repair, proper adhesion requires a clean surface
- Remove all debris, leaves, and loose gravel
- Sweep the entire repair area thoroughly
- For EPDM roofs, clean with appropriate membrane cleaner
- For other systems, use a mild detergent and water
- Allow the surface to dry completely
Thorough cleaning is crucial for repair success. Even minor contaminants can prevent proper adhesion and lead to premature repair failure.
Step 3 – Precisely locate and mark damaged areas
With a clean surface, you can now:
- Carefully inspect the entire roof area where leaks are suspected
- Look for blisters, cracks, tears, or separated seams
- Check the condition of flashing around vents, edges, and penetrations
- Mark all damaged areas with chalk for visibility
Step 4-6 – Material-Specific Repair Techniques
Step 4 – Applying appropriate primer or adhesive
Different roof types require specific primers or adhesives:
- For EPDM: Apply EPDM primer to the repair area and surrounding 6 inches
- For TPO/PVC: Use manufacturer-recommended bonding adhesive
- For modified bitumen: Apply asphalt primer
- For BUR systems: Use compatible roofing cement
Allow primers to set according to manufacturer instructions. Rushing this step can compromise adhesion and shorten repair lifespan.
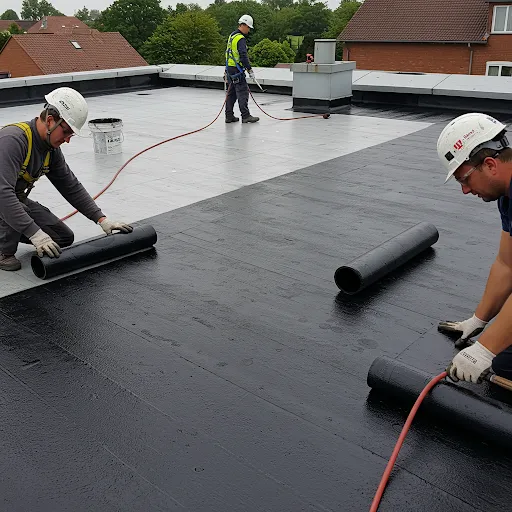
Step 5 – Installing patch/repair material based on roof type
Each roof system requires a specific approach:
Single-ply membrane repair technique:
- Cut patch material 4 inches larger than the damaged area on all sides
- Round the corners to prevent lifting
- Apply membrane adhesive to both the roof and patch
- Allow adhesive to become tacky (finger test)
- Apply patch and roll firmly for full contact
Modified bitumen repair approach:
- Cut appropriate sized patch from matching material
- Apply roofing cement under and around damaged area
- Embed fiberglass mesh for reinforcement
- Press patch firmly, working from center outward
- Apply additional cement over edges
BUR system repair method:
- Remove loose gravel around damaged area
- Apply thick layer of roofing cement
- Embed fiberglass mesh, pressing firmly
- Apply second layer of cement
- Sprinkle matching gravel into wet cement
Step 6 – Sealing and weatherproofing the repair
To ensure long-term protection using effective flat roof waterproofing methods:
- Apply sealant around all patch edges (selecting the best sealant for flat roof materials ensures optimal adhesion)
- For TPO/PVC, consider using a heat gun to ensure proper seaming
- Apply UV-protective coating if recommended for your roof type
- Ensure all edges are completely sealed with no gaps
Step 7 – Final Inspection and Preventative Measures
After completing repairs, follow these flat roof maintenance tips for ongoing protection:
- Visually inspect all repaired areas from multiple angles
- Consider performing a water test with a helper inside watching for leaks
- Document all repairs with photos for warranty and insurance purposes
- Apply preventative maintenance coating if appropriate for your roof type
The Bronx’s combination of winter freeze-thaw cycles and summer heat puts additional stress on flat roof systems. Consider applying reflective coating to reduce thermal expansion and prolong your roof’s lifespan.
When to Call Professional Roofing Services
While DIY repairs can address minor issues, some situations require professional roofing service expertise:
- Extensive damage covering more than 25% of the roof
- Multiple leak points or systemic failures
- Aged roofing materials near end of lifespan
- Structural issues affecting the roof deck
- Repairs requiring specialized equipment
NYC building codes require permits for substantial roof work, and improper repairs can void manufacturer warranties. Professional roofers maintain proper licensing and insurance to protect your investment.
When comparing costs, consider that professional repairs typically last 3-5 times longer than DIY fixes. Although hiring a pro may cost more upfront, it often saves money in the long run—and sometimes, a complete roof replacement is a smarter choice than constant repairs.
Professional roofers can also identify underlying issues that might not be visible to the untrained eye. Their expertise in both repair and roof installation can prevent repeated repair cycles and extend your roof’s overall lifespan.
Quick Reference Table – Flat Roof Materials and Their Repair Requirements
Material Type | Typical Lifespan in Bronx | Common Issues | Repair Difficulty |
EPDM | 20-25 years | Seam failure, punctures | Moderate |
TPO/PVC | 15-20 years | Welded seam failure | Moderate-High |
Modified Bitumen | 15-20 years | Blistering, cracking | Moderate |
BUR | 20-30 years | Alligatoring, water pooling | High |
Extend Your Flat Roof’s Life With Proper Maintenance
Regular maintenance prevents minor issues from becoming major problems. With the Bronx’s variable weather patterns, proactive care is essential for protecting your investment.
Most flat roof problems begin small but grow quickly when neglected. By implementing a consistent maintenance schedule, you can identify potential issues before they cause interior damage.
We recommend scheduling professional inspections at least twice yearly—ideally in spring and fall. Spring and fall are ideal times to fix winter damage and get ready for summer heat or more snow and rain.
Between professional inspections, perform these simple maintenance tasks:
- Clear debris from the roof surface and drainage points monthly
- Check for new damage after severe weather events
- Trim overhanging branches that could damage the roof
- Watch for interior warning signs like water stains or musty odors
When repairs aren’t enough, learning how to install a flat roof the right way becomes crucial—and that’s where professional help matters.
Curious how roofing needs vary across the Bronx?
Ready to ensure your flat roof gets the expert attention it deserves? Contact our Bronx roofing contractors today for a comprehensive inspection and personalized maintenance plan. With over 20 years of experience in the Bronx, our team makes sure your roof gets the best care possible.
CALL US AT 929-570-7620